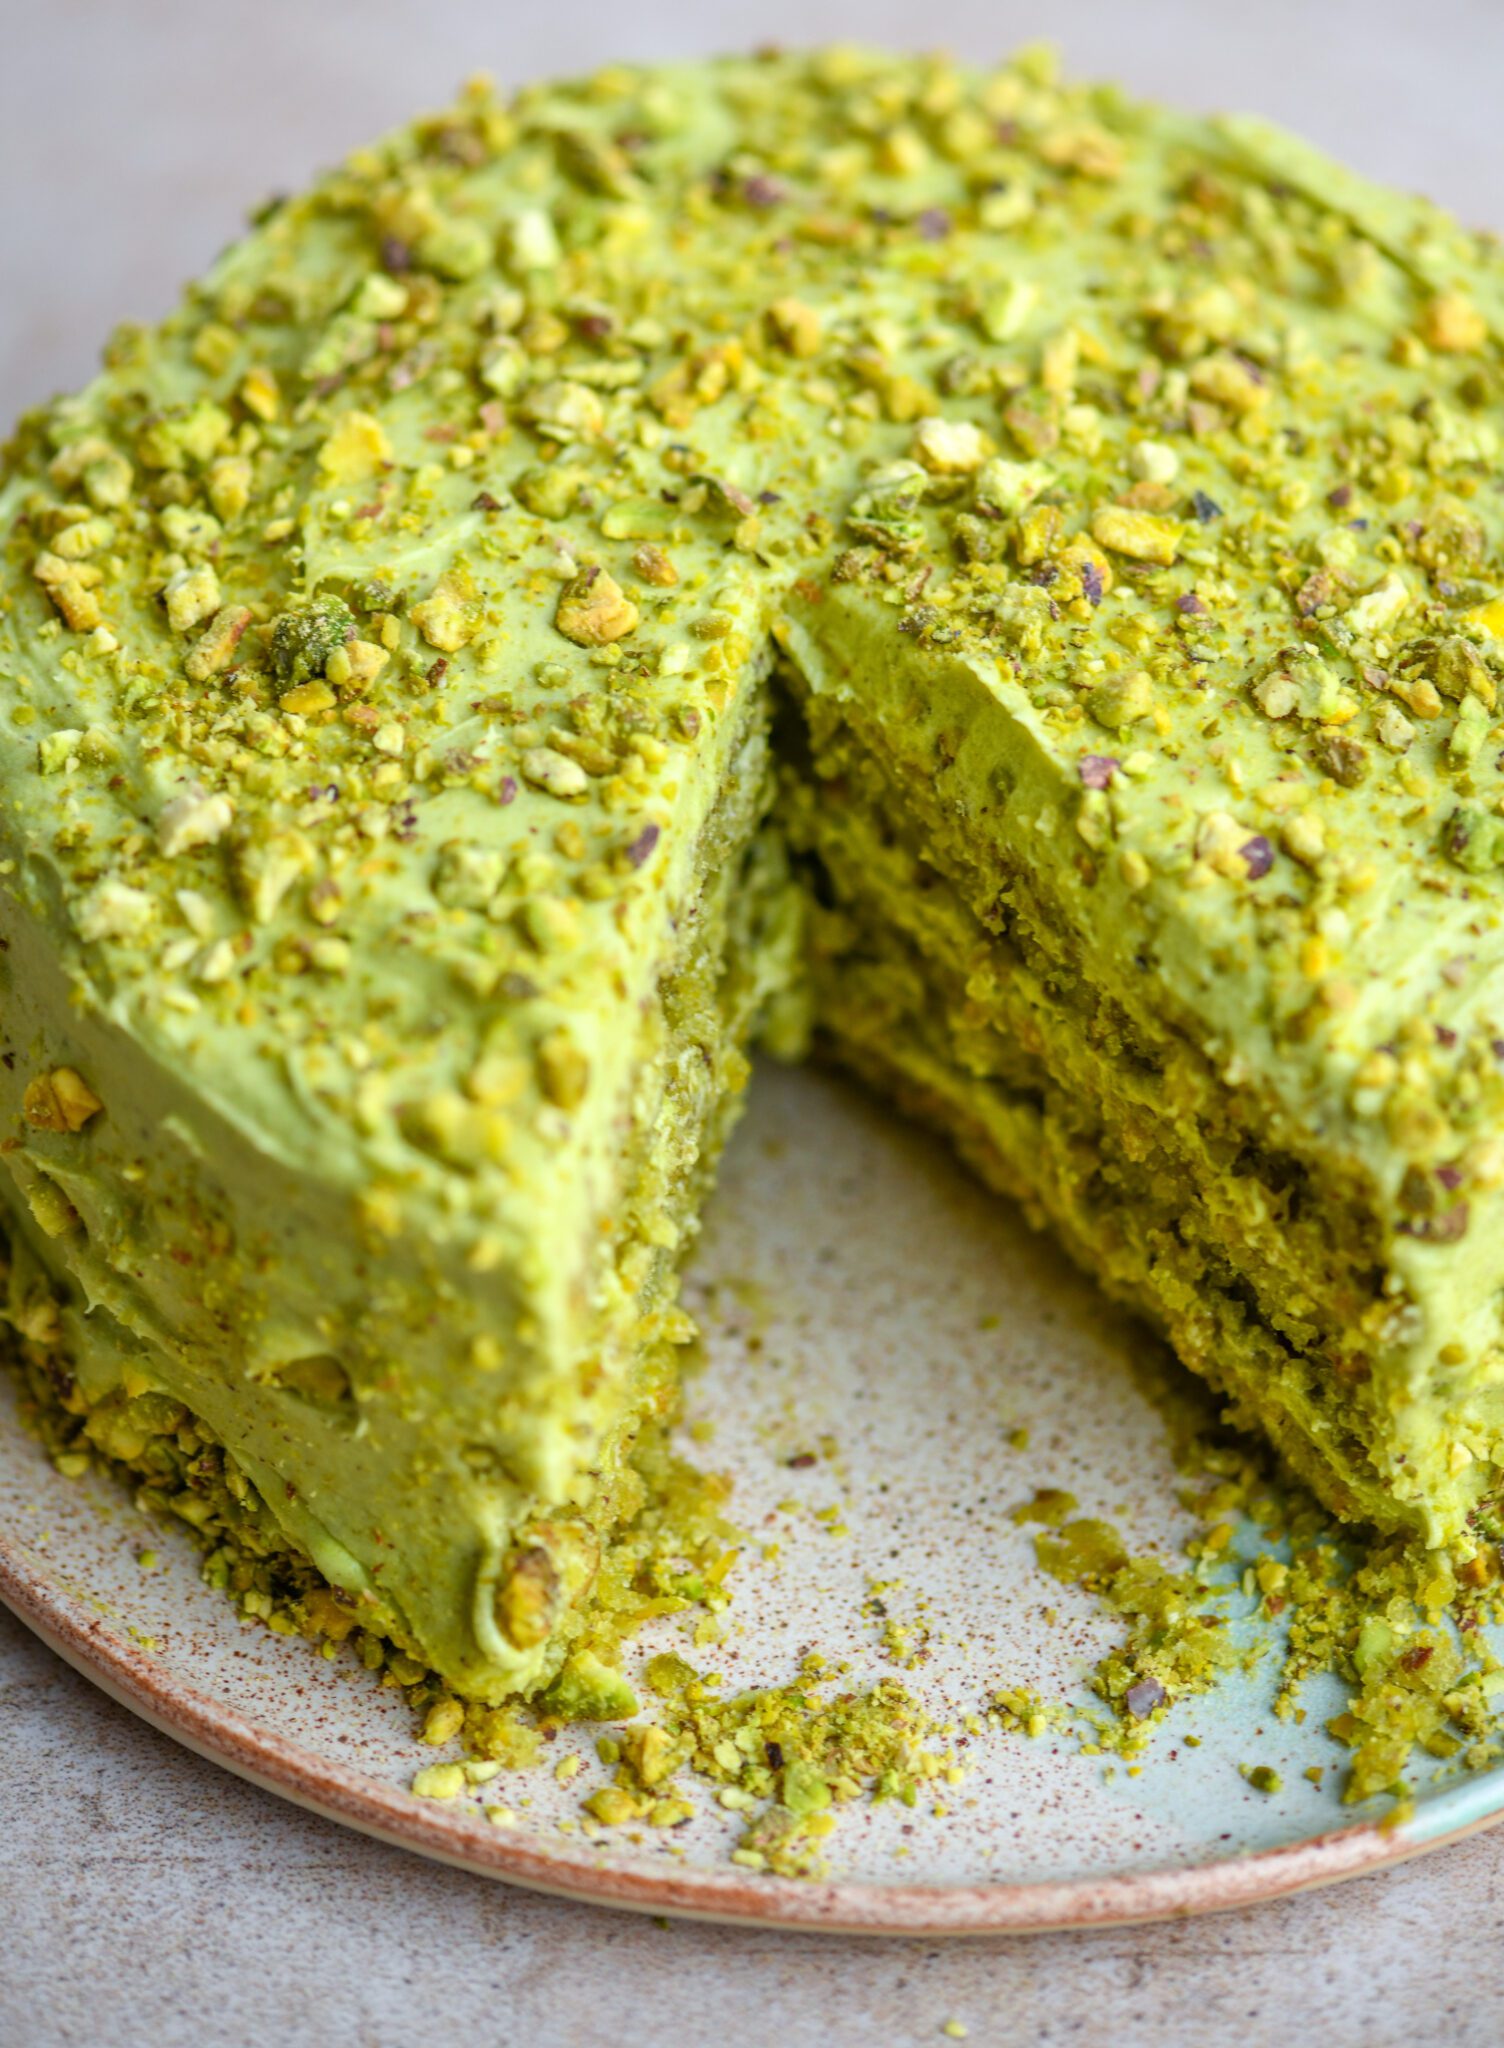
Vegan Pistachio Ombre Cake


Whether you’re looking for the perfect cake to make for a birthday, St. Patrick’s Day, or you simply love pistachios, this Vegan Pistachio Ombre Cake is the ultimate dessert to impress your guests (and yourself!)

Thank you to Setton Farms for sponsoring this recipe! We used their raw shelled pistachio kernels in both the cake batter and the buttercream frosting.
Why You’ll Love this Vegan Pistachio Ombre Cake

The easiest way to make a show-stopping cake that’s as beautiful as it is delicious? Add pistachios and make it ombre (all while keeping it completely plant-based and dairy-free.) The best part about this cake (and why I think you’ll love it too)? The pistachio frosting roses are surprisingly easy and fun to make! TIP: Be sure to check out the recipe video below for a visual tutorial on how to make them.
Ingredients You’ll Need
The following is an overview of the ingredients needed to make this vegan pistachio ombre cake. For the exact measurements, be sure to refer to the recipe card below.

Vegan Pistachio Cake Ingredients
- Vegan Buttermilk: the vegan buttermilk is made by mixing unsweetened soy milk and apple cider vinegar. Instead of soy milk, you can also use almond or oat milk and instead of apple cider vinegar, you can use lemon juice.
- Sunflower seed oil: sunflower seed oil works great because it’s high heat resistant and has both a neutral color and flavor profile. Feel free to replace it with another kind of oil such as olive oil or refined coconut oil though.
- Vanilla extract (or pistachio extract): if you want your cake to be extra pistachio-ey, you can use pistachio extract instead of vanilla extract.
- Granulated white sugar
- Sea salt
- All-purpose flour: for a gluten-free version, I’d recommend using a 1:1 GF all purpose flour blend (like this one from Bob’s Red Mill). I would not recommend using almond flour instead of all purpose flour as the cake might not hold up as well.
- Leavening Agents: baking powder and baking soda
- Vegan liquid green food dye: the food dye is optional, but it’s what helps create the green ombre effect. Instead, you can also use a little spirulina powder, just beware that this might impact the taste of the cake. For a milder (more pistachio-like color, be sure to use a type of food dye that’s labeled “olive green” instead of the regular green ones).

- Setton Farms Raw Pistachio Kernels: these pistachios are perfect for baked goods because they’re already shelled, raw, and unsalted.
Vegan Butter Cream Frosting Ingredients

- Powdered sugar
- Dairy-free butter (not margarine)
- Setton Farms Raw Pistachio Kernels
- Vanilla extract (or pistachio extract), optional
- Dairy-free cream cheese
- Vegan liquid green food dye
Recommended Equipment

- Stand Mixer: a stand mixer makes it so much easier to make cakes and frosting! If you don’t have one, you can also use an electric hand mixer.
- High-Speed Blender: you’ll need a blender to process the pistachios, but you can use a food processor as well!
- Cake Tins & Parchment Paper: You’ll need 7 inch/ 18cm cake tins. Lining them with parchment paper will yield the best result, but you can also grease them instead!
- Cake Decorating Kit: using a cake decorating kit will make the entire decorating process much easier (but you can make it without one as well, using just a piping bag, a nozzle, and a spatula.)
- 2D Nozzle: to create the exact same effect as shown in the photos above and below, you’ll need a 2D nozzle.
How to Make This Vegan Pistachio Ombre Cake (Step By Step)
The following is a step by step overview of how to make this Vegan Pistachio Ombre Cake recipe (with images). For a recap, be sure to refer to the recipe card below.
Step One: Preheat the Oven & Make the Cake Batter Base

Preheat the oven to 350ºF/180ºC and line 3 cake forms (7 inches in diameter each) with parchment paper (or grease them).


To a mixing bowl, add the soy milk and apple cider vinegar. Mix to form the vegan buttermilk, then add the oil, vanilla, sugar, salt.

Sift 1 1/2 cups of the flour (set the other 1/4 cup aside), then add it to the bowl with the baking powder, and baking soda. Mix again.
Step Two: Prepare the Pistachios


To a blender or food processor, add half of the pistachios and process until crumbly.


Add the other half of the pistachios and process again until one part is very crumbly and the other half is chunky (resembling chopped pistachios). Set aside.
Step Three: Customize the Ombre Batter Layers

Divide the batter into 3 equal parts in 3 separate small bowls.

To the first (this will be your top layer), add 2 1/2 tablespoons of all-purpose flour and 3 tablespoons of the pistachio mix. To the second (this will be your middle layer), add 1 1/2 tablespoons all-purpose flour, 4 tablespoons of the pistachio mix and about 5-10 drops of the green food dye. To the third (this will be your bottom layer), add 5 tablespoons of the pistachio mix and about 15 drops of the green food dye (plus more if needed.)


Mix each of them until everything is well incorporated. The middle layer should be light green and the bottom layer dark green. If they’re too similar, add a little extra dye to the bottom layer.
Step Four: Bake the Ombre Cake Layers

Next, pour each layer into their own lined baking form and place in the oven (slightly below the middle).


Bake for 25 minutes or until a toothpick comes out clean, then let cool for at least 30-35 minutes.
TIP: to make sure the layers are cool enough to be frosted, you can wrap them each in plastic wrap and place in the freezer for a bit once cool enough to handle.
Step Five: Prepare the Dairy-Free Cream Cheese Buttercream Frosting
Using either a blender or a food processor, process the pistachios until you get a very fine, flour-like texture (much finer than the texture used for the batter). Sift them to make sure you retain only the finest part (you can set any remaining pistachio chunks aside and striking them between each layer when frosting the cake.)


Next, cut the vegan butter into cubes and add it to the mixing bowl of your stand mixer. Cream the butter, then add the powdered sugar and pistachio flour little by little.

Next, add the cream cheese and vanilla extract and mix until you get a smooth, creamy texture.
Step Six: Add Green Food Dye to Create the Ombre Buttercream Frosting

Remove about 2/3 of the frosting and set aside.

To the remaining part, add a few drops of green food dye (to achieve a very light green) and mix them in.
Decorate the Pistachio Ombre Cake

Once the cake layers are cool enough (ideally fully cooled), layer them, spreading the light green frosting in between each layer.

Next, add a thin layer all around the cake.


NOTE: If you have any light green frosting left over, set is aside for when you’re piping the medium green layer on the cake.

To create the ombre buttercream roses, start with the lightest (top) part. Add some of the frosting (without food dye) to a piping bag with a nozzle (such as a 2D nozzle).

Cover the top of the cake (see the recipe video for piping instructions).

If you had any light green frosting left, you can mix it with the rest of the frosting using the stand mixer. If it’s too light, add a little extra green good dye.

Add some of it to a piping bag and repeat the process until the middle of the cake is covered and there is just enough space for one last layer at the bottom (note: if you’re using a smaller nozzle, you’ll be able to add two layers per shade of green or add more more shades).

Add more food dye to the rest of the frosting until you get your desired shade of dark green, then repeat the piping process until the cake is fully decorated.
Step Seven: Serve and Enjoy Your Vegan Pistachio Ombre Cake

Either serve your cake right away or store it in the fridge (ideally in an airtight cake box or cake carrier to keep it from drying out).

When you’re ready to serve your Vegan Pistachio Ombre Cake, Slice into it using a sharp knife, serve, and enjoy!


Tip: keep any leftovers of your vegan pistachio ombre cake in the fridge or freezer.

Recipe Video
Recipe Tips & Notes

- The most important tip for making this cake is to make sure the cake layers cool down fully before building and decorating the Pistachio Ombre Cake. If you don’t want to wait too long, you can wrap the cake layers in plastic wrap and then place them in the freezer for 30-60 minutes. Or, if you’re prepping the cake layers the night before, wrap them and then store them in the fridge.
- Watch the recipe video to learn how to pipe the roses onto the cake. If it’s your first time using a piping bag with frosting, I’d recommend practicing on an empty plate a couple of times (you can then simply add that frosting back to the rest.)
- The least messy way to use a piping bag is to use two! Take the first piping bag and cut off the end (just enough for the nozzle to fit comfortably – some cake decorating kits come with an elastic band that will help keep the nozzle in place). Next, fill the other piping bag with frosting making sure there’s as little air as possible at the bottom. Massage the bag with the frosting to remove air pockets, then cut off the end and insert it into the other piping bag.
Frequently Asked Questions
The following are some of the most frequently asked question that might arise when making this vegan Pistachio Ombre Cake. If you have questions that are unanswered, please leave a comment below and we’ll get back to you as soon as possible!

Can I make this Pistachio Ombre Cake gluten-free?

Yes! To make this pistachio ombre cake gluten-free, simply replace the all purpose flour with a 1:1 gluten-free flour blend (such as this one from Bob’s Red Mill.)
Can I make this cake tree-nut free?

Yes! You’d need to remove the pistachios (which are the main ingredient), but in case of allergies, you can still make a green ombre cake by replacing the pistachios in the cake batter with extra flour and omitting them from the frosting. The green food dye will still allow you to get the same ombre effect.
Can I prep the frosting ahead of time?

Yes! You can prep the frosting ahead of time and simply store it in the fridge for up to a few days until you’re ready to use it.
Can I use a different kind of frosting?

Yes! You’ll just need to make sure it’s stable enough to pipe onto the cake. Addicted to Dates’ Vegan Italian Meringue Buttercream recipe would work very well.
Vegan Pistachio Ombre Cake – Recipe Card
Use this recipe card to save, pin, or print this vegan pistachio ombre cake recipe. For additional information and step by step photo instructions, be sure to read the full article above.

Vegan Pistachio Ombre Cake
Ingredients
For the cake batter
- 3/4 cup soy milk - unsweetened
- 1 tablespoon apple cider vinegar - or lemon juice
- 3/4 cup sunflower seed oil - or other neutral vegetable oil
- 1/2 tablespoon vanilla extract - or pistachio extract
- 1 cup granulated white sugar
- 1/2 teaspoon sea salt
- 1 3/4 cups all-purpose flour - spooned into the cup, not packed (Divided, see instructions)
- 1 teaspoon baking powder
- 1/2 teaspoon baking soda
- 3/4 cup Setton Farms Raw Pistachio Kernels
- 1 small bottle Vegan liquid green food dye
For the Frosting
- 6 cups powdered sugar
- 2 cups dairy-free butter - (not margarine), softened at room temperature at least 1 hour before making the frosting)
- 1/4 cup Setton Farms Raw Pistachio Kernels
- 1 teaspoon vanilla extract - or pistachio extract (optional)
- 5 tablespoons dairy-free cream cheese
- Vegan liquid green food dye
Instructions
Make the Batter & Bake the Cake Layers
- Preheat the oven to 350ºF and line 3 cake forms (7 inches in diameter each) with parchment paper (or grease them).
- To a mixing bowl, add the soy milk and apple cider vinegar. Mix to form the vegan buttermilk, then add the oil, vanilla, sugar, salt. Sift 1 1/2 cups of the flour (set the other 1/4 cup aside), then add it to the bowl with the baking powder, and baking soda. Mix again.
- To a blender or food processor, add half of the pistachios and process until crumbly. Add the other half of the pistachios and process again until one part is very crumbly and the other half is chunky (resembling chopped pistachios). Set aside.
- Divide the batter into 3 equal parts in 3 separate small bowls. To the first (this will be your top layer), add 2 1/2 tablespoons of all-purpose flour and 3 tablespoons of the pistachio mix. To the second (this will be your middle layer), add 1 1/2 tablespoons all-purpose flour, 4 tablespoons of the pistachio mix and about 5-10 drops of the green food dye. To the third (this will be your bottom layer), add 5 tablespoons of the pistachio mix and about 15 drops of the green food dye (plus more if needed.) Mix each of them until everything is well incorporated. The middle layer should be light green and the bottom layer dark green. If they’re too similar, add a little extra dye to the bottom layer.
- Next, pour each layer into their own lined baking form and place in the oven (slightly below the middle). Bake for 25 minutes or until a toothpick comes out clean, then let cool for at least 30-35 minutes (Tip: to make sure the layers are cool enough to be frosted, you can wrap them each in plastic wrap and place in the freezer for a bit once cool enough to handle.)
Make the Frosting & Decorate the Cake
- Using either a blender or a food processor, process the pistachios until you get a very fine, flour-like texture (much finer than the texture used for the batter). Sift them to make sure you retain only the finest part (you can set any remaining pistachio chunks aside and striking them between each layer when frosting the cake.)
- Next, cut the vegan butter into cubes and add it to the mixing bowl of your stand mixer. Cream the butter, then add the powdered sugar and pistachio flour little by little. Next, add the cream cheese and vanilla extract and mix until you get a smooth, creamy texture.
- Remove about 2/3 of the frosting and set aside. To the remaining part, add a few drops of green food dye (to achieve a very light green) and mix them in.
- Once the cake layers are cool enough (ideally fully cooled), layer them, spreading the light green frosting in between each layer and then a thin layer all around the cake. If you have any light green frosting left over, set is aside for when you’re piping the medium green layer on the cake.
- To create the ombre buttercream roses, start with the lightest (top) part. Add some of the frosting (without food dye) to a piping bag with a nozzle (such as a 2D nozzle) and cover the top of the cake (see the recipe video for piping instructions).
- If you had any light green frosting left, you can mix it with the rest of the frosting using the stand mixer. If it’s too light, add a little extra green good dye. Add some of it to a piping bag and repeat the process until the middle of the cake is covered and there is just enough space for one last layer at the bottom (note: if you’re using a smaller nozzle, you’ll be able to add two layers per shade of green or add more more shades).
- Add more food dye to the rest of the frosting until you get your desired shade of dark green, then repeat the piping process until the cake is fully decorated.
- Serve and enjoy your pistachio ombre cake!
Equipment


Notes
- Store leftovers in an airtight container in the fridge for up to 3-4 days.
- The prep time includes the time to make the frosting and decorate the cake.
- The measurements listed in the instructions refer to the default serving size (8 slices.) While changing the serving size automatically adjusts the ingredient list, it won’t change the instructions, so be sure to adjust the amounts accordingly.
Please note that this site contains affiliate links and we may earn a commission if you make a purchase through those links at no extra cost to you.
Did you love this vegan pistachio ombre cake recipe? Please consider leaving a comment and a ⭐️⭐️⭐️⭐️⭐️ star rating below. Thank you!
SAVE/PIN/SHARE THIS VEGAN PISTACHIO OMBRE CAKE RECIPE

More Vegan Recipes You Might Like
If you enjoyed this vegan pistachio ombre cake recipe, you might also like the following vegan recipes.
- Vegan Pistachio Cake (with Dairy-Free Pistachio Buttercream Frosting)
- Vegan Carrot Pistachio Cake with Cream Cheese Frosting
- Mini Vegan Lemon Pistachio Cupcakes
- Vegan Mini Rose Pistachio Cupcakes
- Vegan Chocolate Ombre Cake


Made this cake for a group of non-vegan friends and everyone raved about it!
The recipe was easy to follow with no fancy ingredients, and a bit of fun with the ombre colouring and piping. Great pistachio flavour, good texture and the slight cream cheese taste in the icing was a win.
Only tip is to definitely use baking paper or spring form tin. I used oil to line one tray and it was very tricky to remove that cake.